SimulatioWrightConten# Wn of
the Figuring Process
J.A. Hudson
Definition of figuring
(fig'-u-ring): An argument between a person and a piece of glass.
In a more serious vein, let's go with the definition offered by
Wikipedia: Figuring is the process of final polishing of an optical surface to remove imperfections or modify the surface
curvature to achieve the shape required for a given application.
Contents
1. The Problem
2. How to Calculate the Process
3. Computer Code
4. Testing
5. Different Strokes
6. The Zoo
6.1. The Straight Stroke
6.2. The W Stroke
6.3. The Radial Stroke
6.4. The Elliptical Stroke
6.5. The Small Tool
7. Discussion
7.1. Noting a Paradox
7.2. Deepening the Curve
7.3. Maintaining the Curve
7.4. Lessening the Curve
7.5. Curing a Turned-Down Edge
7.6. Curing a Raised Center
7.7. Curing a Raised Zone
7.8. Curing a Depressed Zone
7.9. Curing a Depressed Center
8. Comparison to Authorities
9. Final Judgement1. The Problem
The optician
invariably reaches a point in polishing a surface, where there are defects, seen either with the knife-edge test or by
interference fringes off a test plate, or from a ZYGO
interferometer. What to do with a "rolled" edge? What's the
safest way to eliminate a hill in the center? What about a "hole"
in the middle? This is the art of figuring.
I've often wanted to be able to simulate the
effect of a given stroke to see where it would cause the most wear,
and to be able to adjust the stroke so the right effect is achieved.
Much better to learn from a few runs of a computer program than a
session of doing the wrong thing, and having to live with the
consequences!
Contents
2. How to Calculate the Process
What controls the rate of material removal, and
how in fact does the process work? I've heard some strange theories
about this - the material is somehow "scraped" away,
smoothing the surface. The glass is actually induced somehow to
"flow" from one place to another, on a microscopic scale,
of course. More plausible is that the polishing compound, commonly
CeO2, attacks the silicon dioxide
chemically, forming Si-O-Ce. Then these bonds are severed,
resulting in removal of SiO2. (See References.)
Some have argued that OH- bonds with the silicon, and
these molecules of silicon hydroxide are what is removed. Whatever
the chemical process, what is pertinent to the optician is that the
removal process requires contact between work and lap, and the
polishing rate increases with velocity and pressure.
It is a
straightforward computation to assume the stroke of work on tool or
tool on work takes place in incremental steps, and at each step,
every point on the work suffers a small amount of removal. It wasn't
obvious to me, however, how to account for the situation where tool
overhangs the work, or vice-versa. How to account for the extra
pressure, which we know from experience, must occur? I toiled with
finding the center of gravity of a lune-shaped object (the
overhanging material), and so forth, before realizing that one can
approximate the situation by assuming the upper object in the figure
below is
being supported by an elastic medium (say, a bed of springs). It
doesn't matter what the shape of the overhanging object is - the
object is rigid, and so it will impose a deformation in the material
underneath which, to a good approximation, is linear across the supporting area, and reflects the
amount of restoring force caused by the spring compression. We may
assume
it has the form V = Vo + mx, where Vo and m are constants, and x is the distance
from the point of overhang. Since shape of the object is unimportant,
we assume it to be brick-shaped, with length L. The
overhanging part has length h, and the brick stays in contact
with the support over a length T, where T <= L - h.
(If the brick is teetering on the edge, T will shrink to 0.)
And of course, if there is no overhang, the supporting forces V
will be uniform. (Actually, V has units of force per unit
length.) The forces V will add up to W, the total
weight of the brick. That sum is
W = Vo T + m
T2/2.
The sum of the moments about
x=0 should be 0, so writing M for the moment caused by W, we have:
M = Vo T2/2
+ m T3/3 = W(L-2h)/2,
giving us two
equations in the unknowns Vo and m. The result:
Vo = W (4 T - 3 L + 6 h)/T2,
m = -6W (T - L + 2h)/T3.

Fig. 1. Reaction forces V due to weight W.
For
circular work and tool, take L to be the diameter of the upper
piece. W is incorporated into a "wear factor," which
determines how much material is removed at each step. It should be noted that, as h
increases, a point will be reached where the reaction force on the
right side above reaches 0. This starts to happen when h = L/4. So T must be computed for the point where the V value is 0. This is:
T = (3L - 6h)/2.
Now we
have the tools we need to compute the wear on the work. We gloss over
an important point, which should perhaps not be ignored: The high
points will wear away faster than the valleys, and the more so the
sharper they are. I haven't accounted for this.We may, however, study
the effect a given stroke schedule will have on a flat piece of
glass, watching the relative amount of wear across the work. We also
don't take account of any curvature in the upper object, which won't be
negligible for strongly curved optics.
Contents3. Computer Code
I
wrote a computer code, called figuring, which carries out the
above calculation. It is written in Ada (see references); a free
version of Ada, called GNAT, is available from the AdaCore Company, and it may be used
under the terms of the Gnu License Agreement - it is essentially
free, and code written with it may also be distributed under the
terms of the Gnu License. (Write me if you want a copy of figuring
for a Windows system.)
Figuring reads an input radial profile
(a file named flat.dat is provided for the most-studied case) of the
work before polishing. This profile is supposed to list the deviations from desired or correct curve, rather than the curve itself (which we take to be slight). Figuring reads a bitmap file (Microsoft .bmp) in
which the pitch lap facets appear as perfectly black lines and the
working surface as perfectly white (255,255,255). This allows us to
see the effects of lap grooves if that is of interest. It allows (by
blacking out parts of the lap) the effect of pressing a mask over the
lap. Or one may ignore the effects of chaneling and use a perfectly
white lap (lap_no_channels.bmp). A file may be named to receive the
output radial profile. That filename will have .sched.bmp added to it
for a display such as those appearing below. The path the tool center
(if work is facing up) or the work center (if work is face down) is
specified as a list of x, y coordinate pairs in a text file. Many
examples are shipped with the program. The work diameter and tool
diameter are also specified and whether the work is face up (check
box on the form that appears). An offset of tool (or work) center
must also be given. Also the wear factor may be entered. This is the
quantity (scaled according to reaction force magnitude) that is
subtracted at each step of the path. After one pass through the path,
both work and tool are rotated by 360o/N Rot, N Rot being
the number of rotation steps taken. The tool is given an extra random
nudge to simulate what really happens. After one full turn, the
program stops. As it is set up now, figuring should be run in a DOS window so that any error messages will be visible.
Here is the fragment of code which calculates the reaction force wedge:
   ----------------------------
   -- Compute_Force_Gradient --
   ----------------------------

   function Compute_Force_Gradient return Force_Gradient_Type is
      h, T, Vo, m, s, rw, rt, L
            : Long_Float;
   begin
      s    := abs(Pxy);
      rw   := Sched.Work_Diam / 2.0;
      rt   := Sched.Tool_Diam / 2.0;
      if Sched.Work_Up then
         h    := s + rt - rw;
         L    := Sched.Tool_Diam;
      else
         h    := rw + s - rt;
         L    := Sched.Work_Diam;
       end if;
      T   := (3.0*L - 6.0*h) / 2.0;
      if T > L-h then T := L-h; end if;
      if h <= 0.0 then
         Vo  := 1.0/L;
         m   := 0.0;
      else
         Vo  := (4.0*T - 3.0*L + 6.0*h) / T**2;
         m   := -6.0*(T - L + 2.0*h) / T**3;
      end if;
      return (h,T,Vo,m);
   end Compute_Force_Gradient;
Here,
Pxy is a vector from center of work to center of the tool, Sched is the
set of input options and values, and the other variables are those you
see in the above equations. Force_Gradient_Type is a simple data
structure containing the variables h, T, Vo, and m. This code fragment constitutes the main loop of the program:
   ----------------
   -- Work_Cycle --
   ----------------

   procedure Work_Cycle is
      Sxy    : Vec2;
   begin
      WorkTheta := 0.0;
      ToolTheta := 0.0;
      for cycle in 1 .. Sched.NRotations loop
         WorkMat := Rot(WorkTheta);
         ToolMat := Rot(ToolTheta);
         ToolP   := WorkMat*(Sched.Tool_Offset, 0.0);
         for stroke in 1 .. StS.N loop
            Sxy := (Sts.x(stroke), Sts.y(stroke));
            Pxy := ToolP + WorkMat*Sxy;
            if abs(Pxy) > 0.0 then
               Hhat  := Pxy/abs(Pxy);
            else
               Hhat  := (1.0,0.0);
            end if;
            React := Compute_Force_Gradient;
            if Sched.Work_Up then
               if React.h > Sched.Tool_Diam/2.0 then
                  raise TOOL_FELL_OFF;
               end if;
            else
               if React.h > Sched.Work_Diam/2.0 then
                  raise WORK_FELL_OFF;
               end if;
            end if;
            Work_Wear;
         end loop;
         WorkTheta := WorkTheta
           + 2.0*PI/Long_Float(Sched.NRotations);
         ToolTheta := ToolTheta
           - 2.0*PI/Long_Float(Sched.NRotations)
           - 0.25*Long_Float(Random(Rands));
      end loop;
      return;
   end Work_Cycle;
Here,
StS is the stroke schedule, consisting of a set of (x,y) points
relative to work or tool center, which determines the work (if on top)
path or tool path (if on top). You specify these in the tool path file
that's input to the program. Rot () is a function that calculates a
rotation matrix for a 2-d coordinate rotation thru a specified angle.
This is how the tool and work are rotated as you walk around the
barrel. Note that the tool angle is incremented an additional quarter
radian times a random number (between 0 and 1). Tool and work are
rotated in opposite directions. Hhat is a global vector used by the
Work_Wear procedure, which points along the tool-work line. It is
a unit vector. The Work_Wear procedure goes thru the array of points
representing the work surface, applying an amount of wear proportional
to the pressure at each point.
The work area is gridded into cells (257 x 257
in current version; the actual work area dimensions are (-128..128,-128..128).. Only those cells exposed to the tool will
experience wear, and the wear, as indicated above, is scaled
according to the amount of overhang.
Now, let me be very
frank: no model of any physical process, even a ball rolling down a
ramp, is ever quite right. Mother Nature always comes up with an
effect you didn't think of. For instance, the wind that blew down the
Verazanno-Narrows Bridge. So with this caution in mind, I'll
display some of the results of my simulations.
Contents4. Testing
First, let's test the
model to make sure the work surface is handled the same way whether
face up or face down, in the absence of gravity. To handle this, I
temporarily modified the code so that no wedge occurs in the reaction
force vectors. I also use a "smooth" lap--one without grooves. The results:

Fig. 2. Testing symmetry of work face up and down, in absence of gravitySome
explanation is needed. The work is colored cyan and the tool golden.
Whatever is on top is what you see to the left in each display. The
stroke schedule is plotted on top of that. The program parameters that
may be set are these:
Input Profile:  The name of a text file containing (r,h) r being a radial coordinate and h the deviation of
                the surface from ideal, in arbitrary units; consider them "fringes."
Lap File:       A 24-bit bitmap file (Microsoft .bmp) with black for grooves and white (255,255,255) for
                facets of the pitch lap. See an example below.
Output Profile: The computed average radial profile in same format as the Input; can be cycled over again.
Tool Path:      Another text file specifying coordinates for the center of the tool to follow (or the
                center of the work to follow, if on top), in small increments.
                A number of "standard" tool path schedules are given with names such as W5x4.dat.
Work D:         Diameter of work piece, inches or mm, but consistent with tool path units
Tool D:         Diameter of tool
Offset:         Amount to offset tool from work when at the (0,0) point on the specified path.
Face Up?        Whether the work is face up, with tool on top. YES or NO.
Wear F          Wear factor, arbitrary units; an input value of 1.0 has always been the case with the
                computer runs shown below, but this number gets divided by the number of steps in the
                tool path to try to make the wear more comparable for different strokes. It is assumed
                for instance that the optician will go back and forth several times with a straight stroke,
                while only making a couple of repeats of a more complicated stroke like the tapered W.
N Rot           Number of partial rotations of mirror and tool - angle being 360 degrees/N Rot. The tool is
                rotated in the opposite sense to the work, plus a slight random increment.
The
wear is shown on the work in the right-hand figure on the output
display as a gray-scale rendition, with most wear appearing dark, and
the high points as white. A wedge and scale are shown above. Profiles
for the input and output are shown - slices through the horizontal
line. Since the results are normally radially symmetric, this should
represent the whole work surface pretty well. In addition to an output
work profile, a parabolic curve is also drawn, matching edge and
center, to indicate how close your work fits a sphere. The lap files
look like
these:
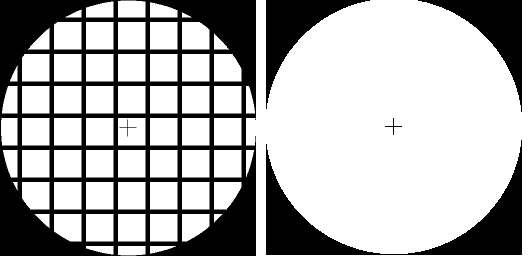
Fig. 3. Lap files
The little cross is actually part of the file, and sometimes makes itself present on a profile plot.
More testing: If we take just one stroke, and a straight one, what does
the wear pattern look like? Does it make sense? Again, without grooves:
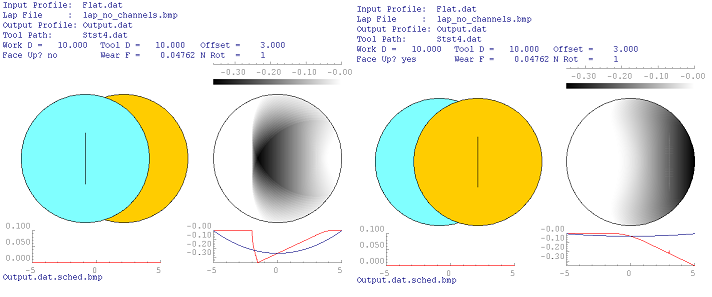
Fig 4. Single stroke, work face down, and face up
While
the face-up case (second figure) seems obvious enough - the wear is
greatest along the edge, and since there is lots of overhang, the tool
comes partly out of contact along the central parts of the work, and
the tapering off of force is apparent. The face-down case (first
figure) requires some more explaining. Let's break down the 4 inch
stroke into 4 short segments beginning with the work at a 3 inch
offset, even with the center of the tool. Then the next three computer
runs show its progress upward in the diagrams:

Fig. 5. Analyzing the single stroke, face downWe
see as the work progresses from 0 upward to 2 inches above the
horizontal line, the position of the overhang rotates in azimuth, and
the amount of wear increases, too, most of it along the edge of the
tool. Notice that the work breaks contact with the tool well inside the
dimensions of the tool, indicating this greater pressure. Now, when we
add all of this up, we see how the maximum wear zone curves sharply,
forming a crude lune-shape. Why does the wear appear to be so nicely
uniform working face up? Well, the wear along the edge isn't uniform,
but it just isn't obvious in the diagram. Bear in mind now that the odd
wear we saw on the work face-down is, in the opposite case, happening
to the tool! So when we now bring work and tool together
center-on-center, we'll find we've lost the nice contact we had after
hot-pressing. A more obvious lesson of the same effect is seen during
rough-grinding of a concave mirror. If an overhang stroke is used to
quickly arrive at the desired depth of curve, subsequently we find the
mirror is out of contact with the tool as seen with the pencil test,
and if we don't do something about the discrepancy before going on to
finer grits, we'll be stuck with a hopeless figure and awful pits!
Contents
5. Different Strokes
Texereau makes a lot of use of the "W" stroke, and I thought it would be nice to illustrate why:

Fig. 6. Advantage of the W strokeEvery
lap, besides having grooves, often has a missing facet or some damaged
ones. The W repairs this nicely.
I thought it would be a good idea to standardize on several kinds of
stroke commonly used: straight back-and-forth, W, tapered W, and oval
(elliptical). I'll present a "zoo" of what these do working both face
up and down, and then try to put together some final advice in
conclusion. I'll also try to compare these findings with advice given in traditional books, such as the ATM series.
Contents6. The Zoo
In the various figures that
appear below, if there are 4 (typically), then I'll refer to them as
(a),(b),(c), and (d), although I've not marked them with the letters.
So, for example, Fig. 7 (b) refers to a straight stroke, length 3,
offset 0, the second output display seen there.6.1. The Straight Stroke
Work face up:

Fig. 7 Straight stroke, work face up, no offset
Work face down:

Fig 8. Straight stroke, work face down, no offset
Various offsets, work face up

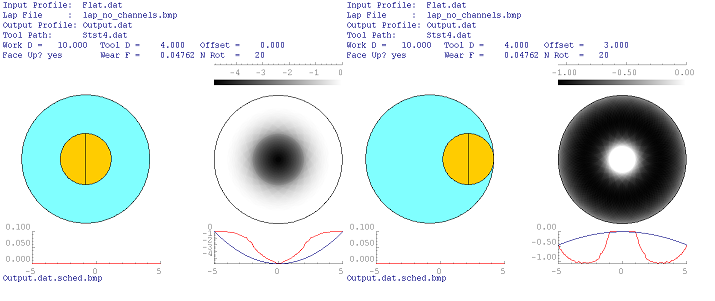
Fig. 9. Straight stroke, work face up, various offsets and stroke lengths
Various offsets, work face down
 Fig. 10. Straight stroke, work face down, various offsets and stroke lengths
Contents
6.2. The W Stroke
Work face up

Fig. 11. W stroke, work face up, no offset
Work face down

Fig. 12. W stroke, work face down, no offset
Runs with various offsets using the W stroke don't produce any results differing by much from those seen with straight strokes.
Contents
6.3 The Radial Stroke
A radial (sideways) stroke is made along the line through the
overhang. In practice, you would stand, say, adjacent to the
overhang, and move the tool or work forward and backward. Here, I've
only explored it with a moderate 3 inch stroke (roughly 1/3 diameter).
Work face up, various overhangs

Fig. 13. Radial stroke, work face up, various overhangs
Work face down, various overhangs

Fig. 14. Radial stroke, work face down, various overhangs
Contents6.4. The Elliptical Stroke
Elliptical
strokes are difficult to manage by hand, but are natural for machines,
such as the Hindle. Typically, the throw is twice the width of the
stroke, resulting in an ellipse whose major axis is twice the minor
axis. We attempt here to simulate that with 2x1, 4x2, 6x3, and 8x4 "O"
strokes.
Work face up

Fig. 15. Elliptical stroke, work face up, no offset
Work face down

Fig. 16. Elliptical stroke, work face down, no offset
Various offsets, work face up

Fig. 17. Elliptical stroke, work face up, various offsets
Various offsets, work face down

Fig. 18. Elliptical stroke, work face down, various offsets
Contents
6.4 The Small Tool
Small tools are often desirable when working large optics. They are
sometimes resorted to for removing serious raised zones, although the
author's experience has always been that they have side effects, or
they miss the target. In hand work, it is difficult to place the tool
where it is supposed to be. In every case, the work is oriented face-up.
Various strokes with small tools

Fig. 19. Various strokes with small tool
Elliptical strokes with small tools

Fig. 20. Elliptical strokes with small tools
Smaller tools

Fig. 21. Smaller tools
Contents
7. Discussion
7.1. Noting a Paradox
Some general points can be made. One interesting one is the fact that
strokes intended to make the work more concave operate more rapidly
than those attempting to make the work more convex. There seems to be a
paradox here. Consider Fig. 22, showing

Fig. 22. Crossection of the work, comparing volumes.
a
crossection through the work piece, assumed symmetric about the
vertical line. There is a paradox here. A simple calculus problem:
Compute the volumes
of the yellow and blue regions in the above figure, assuming it is a
solid of revolution about the central axis. For such slight curves we
have on our optics, or the even smaller curvatures involved in changing
from one radius to a near-by one, we may take the dividing boundary to
be parabolic, with h = k r2, where k = 1/2R, R the radius of curvature and r the distance from center. An infintesimal annular volume of the blue region is then dVb = 2πr kr2 dr, so by simple integration, Vb = (1/2)πkrm4, rm being the radius at the margin. Now, the volume of the cylinder consisting of blue and yellow parts is πkrm4.
So
the volumes of the blue and yellow portions are equal. So, why is it
more difficult to remove the blue volume than the yellow? My
explanation: gravity puts the wear on the central part of the
down-facing work all of the time. With the up-facing work, as you go
around the edge, gravity works on each portion of the edge part-time,
and so the process of wearing down the edge is slower. The
simulations shown in Figs. 16 and 17 show the concavity from an equal
amount of polishing to be twice the depth as that of the convexity.
Contents
7.2. Deepening the Curve
If one wants to deepen the curve while maintaining a spherical shape,
then probably nothing is better for this than a long, straight stroke,
as in Fig. 8 (d). Of course, the stroke doesn't need to be absolutely
straight; some side-to-side excursion is recommended to avoid having
the pitch channels produce artifacts in the figure. A broad W stroke,
as in Fig. 12 (d) will produce the same result. If all you have
is a small tool, then a W stroke of moderate length will generally hold
a spherical shape, but beware of zones forming. Fig. 23 shows various
ways to make the work more concave.

Fig. 23. Various strokes to produce a more concave surface.
There
doesn't appear to be a "happy" way for an oval stroke or a small tool
to achieve a true sphere - only approximations with some zones
remaining to be cured. By far the best method is a straight stroke, and
a long one. The short, radial stroke is just as good.
Contents
7.3. Maintaining the Curve
If one is intent on maintaining the radius, but requires more polishing to be done, Fig. 24 provides some remedies.

Fig. 24. Various strokes to maintain the radius
Note
that the slight deviations from "flat" are small in proportion to the
amount of material removed with the first three techniques, but
the small tool has some zones. What causes the annoying "hole" in the
center with the small lap? Note that, while overhang is at work
here, it is moderate, and there is still some wear taking place within
the zone with radius defined by the inside edge of the tool. The region
from center to that edge is always
in contact with the tool, whereas the region just outside sees much
less of the tool. So it is no surprise to have a depressed center
surrounded by a raised annulus. These zones are about twice as intense
as those made with the full-sized tool. The width of the "hole" varies
with overhang, but no offset can be found that avoids the zones
entirely.
Contents
7.4. Lessening the Curve
Finally, if one is intent on making the work more convex, we have these remedies:

Fig. 25. Various strokes to make work more convex
Contents
7.5. Curing a Turned-Down Edge
For
curing a turned-down edge ("rolled" edge), short strokes are
recommended. The length of the stroke needs to be adjusted to the width
of the zone, very short strokes need to be used on a vary narrow zone.
(To do this, the author likes to use small W strokes with no offset,
working the tool rapidly back and forth while going slightly sideways
both directions, before rotating work and tool.)

Fig. 26. Rx for turned-down edge
Contents
7.6. Curing a Raised Center
For curing a hill in the center,

Fig. 27. Rx for hill in the center.
Watch out! This is heap powerful medicine, and should only be tried in short sessions.
Contents
7.7. Curing a Raised Zone
For curing a raised intermediate zone,

Fig. 28. Rx for intermediate raised zone
The
zone center requires different strokes. For one near 4 inches (4/5
radius), a straight stroke somewhat inside (2.25 inches) is required.
For a zone a little farther in at 3 inches, the 2 inch offset coupled
with a W stroke seems to do the task. Note that the offset needs to be
less than the zone high ridge radius, and this can be tricky to adjust
by hand. The elliptical stroke (Hindle machine) set at 2 inches offset
produces maximum wear at the 3 inch zone. With the small polisher, here
a 4 inch tool, the 2 inch offset results in maximum wear at about the 1
inch zone - not what you might expect. Quite likely, these "cures" will
result in a central hill, which needs to be carefully dispatched using
one of the technizues in Fig. 27. Note that Fig. 28 (a) is the same
computer run as Fig. 24 (a), and is very gentle.
Contents
7.8. Curing a Depressed Zone
For curing an
intermediate depressed zone, it appears to be necessary to deepen the
curve, as these remedies will do as a side-effect.

Fig. 29. Rx for depressed intermediate zone
Note
that in these simulations, the figure lies well above the reference
sphere for a deepened curve, while edge and center aren't much changed.
Contents
7.9. Curing a Depressed Center
For curing a hole in the center -

Fig. 30. Rx for central hole
Note
that these are generally convexing strokes. Sometimes, a hole is better
treated by masking off the central facets of the pitch lap using a
waxed-paper cutout and pressing; however, the lap is now in need of
re-pressing before it can be used normally.
I think
that's about as far as I can project what will happen with various
tools and strokes. I am of course neglecting the fact that moderately
long and/or broad strokes will eventually wear down sharp raised zones.
However, if you try to attack them with a small tool, or with
overhanging strokes, be on the lookout for unwanted zones where you
"missed" the target.
Contents
8. Comparison to Authorities
Please refer to the References page to get details of these books.
Not too many ATM books zero in on this important finishing stage of
polishing, which is partly my motivation for creating this web page.
Let's start with Strong, Chapter II. Many amateurs, including this one,
have tried the various figuring techniques shown there. His cure for an
intermediate depressed zone using a small tool doesn't appear to be
very different from ours, but working face up with full lap, on what
would be a 5 inch straight stroke on a hard lap would produce the opposite
effect to the one desired. However, if the stroke were shortened, then
the effect is to flatten uniformly all territory inside the outer edge,
which gets turned up, if working on a hard lap. On a soft lap, the edge
probably doesn't turn up, and Strong recommends a soft lap.
For deepening the curve, Strong uses a star-shaped lap that is small,
working face-up. This would be something like our Fig. 20 (a). For
making the curve more convex, his technique, using full lap, is similar
to our Fig. 25 (b), only our stroke is longer. Strong offers no cure
for turned-down edge. This chapter however is rich with methods for
making all kinds of optics from simple lenses to a Schmidt camera. Well
worth the read if you can find a copy of this book, which was for many
years a must read for physics graduate students.
A good
list of common surface defects is given by Texereau in his Chapter II.
His fix for several of these involves applying greater pressure with
one hand than the other - I personally have found these techniques
beyond my skill, and I suspect beyond that of others, and so I've
placed greater attention on uniform pressure and a rather limited set
of strokes. However, his cure for turned-down edge will work quite
nicely with uniform pressure if the W stroke is kept short in length
and width. The W will help avoid local zones from forming, owing to
channels or missing facets in the pitch lap. We seem to be in agreement
here.
Texereau's cure for a central depression is the
same as Strong's - depress a central portion of the pitch lap, and
polish as you normally would. This depression can be made temporary by
pressing a small piece of waxed paper on the lap. Texereau's cure for a
central hill follows our Fig. 27 more or less, but with the refinement
of tapering off the W stroke while moving the work inward. Very classy,
and better than anything I've offered above. Again, beware of
over-doing this procedure. Much easier to cure a hill than a valley.
This entire chapter II of Texereau's book should be studied by every
telescope maker, as it is built upon many years' experience by the
author, and also by his many students.
In Amateur Telescope Making, Book One,
is a pretty thorough description of how to go about making a telescope
mirror by the Rev. William F.A. Ellison, which comprises part II of the
book. Ellison describes in a qualitative way what we have attempted to
say in a more quantitative way: use of overhang is a tool one can use
in making the slight corrections to a spherical mirror to make it
parabolic. For the deviation of a parabola from a circle requres longer
radii of curvature as one proceeds from center to edge. He suggests
using straight strokes with increasing amounts of what we've been
calling offset, winding up with the mirror (face down) being worked on
the very edge of the lap. This, as we saw, is "powerful medicine," and
has to be done a little bit at a time. If one deepens the center too
much, the way back "uphill" requires blanking out the center facets of
the tool, whereas our cure for a "hole" in the center is to put the
tool on top and take long strokes on a hard lap.
Ellison
makes the observation that a hard lap tends to cause you to work uphill
naturally, that is, the edge is raised relative to the center, but it
appears that most of his methodology involves using a soft lap - one in
which the pitch flows more readily at room temperature. Our computer
code is incapable of dealing with a soft lap. Our hard lap will work
"uphill" as shown in Fig. 10 (a).
Ellison also was a Hebrew scholar, known for his translation of the Psalms.
In Amateur Telescope Making, Book Two,
we are treated to a more thorough description of the mirror-making
process, thanks to A.W. Everest. Everest cautions us to be aware of
various thermal effects in fine grinding and polishing. While he says
the evaporation effect during final stages of grinding can result in a
turned-down edge, this author hasn't experienced that effect; however
his explanation of ploughing into a soft lap seems reasonable, and
matches my own experience. I've started with a barely-polished
mirror that clearly showed a diffraction edge, only to witness its
gradual decay and replacement by a glare at the opposite edge.
The cure: short strokes on a hard lap. Fig. 11 (a) or 12 (a).
Everest does call to our attention the effects of overhang, and points
to the gradient of pressure that exists--high at the point of overhang,
and declining inward, even becoming negligible. He uses overhang in
various ways: To correct a central hill, his cure is the same as ours.
If the hill should then be penetrated by a hole, then the point of
overhang is moved to the high crater rim, and short strokes used.
Blending is achieved by varying the point of overhang. (A W stroke
would do this.)
Everest does advocate using a small lap
for figuring a parabolic shape onto the work, using a W stroke with
tapering to bring out the desired "doughnut" correction (deviation from
a sphere). Everest depends upon principles, qualitatively stating what
we attempted to quantify, and relying on testing (as we all need to) to
see what is really happening.
In the same ATM book,
various workers describe their experiences with small tools. Paul Linde
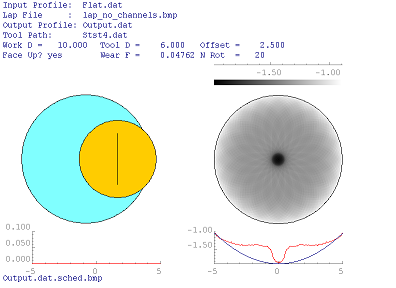
gives the recipe for maintaining radius, conveniently for a 10 inch
work piece and 6 inch tool: Offset 2.5 inches, Stroke 4 inches. Our
simulation shows this result:

Fig. 31. Simulation of Paul Linde's recipe for small tools - maintaining radius.
It
appears to me that a hole will result; this could be tolerated in a
reflector telescope mirror since the central portion either will be
perforated or will lie in the shadow of the diagonal Newtonian mirror.
And, with hand work, the hole won't be so pronounced, as the stroke
will vary too much to create the above result to the same depth. And it
could well be that our theory is all balderdash! Modelers should be
humble.
ATM Book Three
is devoted to various advanced projects, and has little more to say
about the art of figuring either telescope mirrors or flats. However,
there is much that is worthwhile to read here. A story in this book we
should all take to heart is that of Bernhard Schmidt, written by Dr.
Paul C. Hodges.
Contents
9. Final Judgement
Now I turn the matter over to the reader. How does this
simulation compare with your own experience? It would be
especially useful to have results from machine work, if in fact my
simulations predict the same strokes your machine uses. This is all
somewhat speculative to me, and I'm looking to root these simulations
in the real world.
I have personal experience with three
of these simulations while working a (very reluctant) flat. Yes, to
cure a rolled edge, short strokes as described here really work. But
you have to do a lot of them! Yes, one can cure a raised zone
using a small tool. I did this using a 2 inch diameter pitch
polisher. Only I missed! Part of the raised zone was cured, but
the "cure" spilled over into the region outside the zone, worsening
what had already been a rolled edge. This was eventually fixed by
continuing the turned-down edge cure (short strokes, full lap over
center). And, yes, the maintenance of the radius (in my case,
this was flat) can be done using a 3 inch stroke with a 2 1/4 inch
offset, as in FIg. 24(a). This was all hand work.
Contents
References
Books
Ingalls, Albert G., ed, Amateur Telescope Making, Book One, Scientific American, Inc., New York 1981 (4th ed.).
Ingalls, Albert G., ed., Amateur Telescope Making, Book Two, Scientific American, Inc., New York 1959 (1st ed.).
Ingalls, Albert G., ed., Amateur Telescope Making, Book Three, Scientific American, Inc., New York 1953 (1st ed.).
Roark, Raymond J., Formulas for Stress and Strain, McGraw-Hill, N.Y. 1965.
Strong, John, et al., Procedures in Experimental Physics, Prentice-Hall, Englewood Cliffs, NJ, 1938.
Texereau - How to Make a Telescope, Allen Strickler, Transl., 2nd ed. Willmann-Bell, Inc.,Richmond, VA, 1984.
Ada Programming Language
GNAT Ada - https://www.adacore.com/community
Installing GNAT - https://www.radford.edu/~nokie/classes/320/compileInstall.html
Intro to Ada - http://wiki.ada-dk.org/start (yes! Denmark)
Get Ada Now! - http://getadanow.com/ (Lots of examples, instruction, and a downloadable GNAT Ada)
GWindows - https://sourceforge.net/projects/gnavi/files/latest/download (Full GNAVI system not yet here, but gwindows is a powerful
set of widgets (edit boxes, drop boxes, buttons, etc.) for MS Windows.
Theory of Polishing
Desai - http://plaza.ufl.edu/jainilndesai/project%20reports/Advances%20and%20Processes%20in%20Precision%20Glass%20Polishing%20Technique1.pdf
Rodriguez - http://www.alcoat.net/webtele/polishing_theory.htm
Wikipedia, on figuring - https://en.wikipedia.org/wiki/Figuring
Commercial Equipment
ZYGO metrology - https://www.zygo.com/?/met/markets/opticaltest/
Verrazano-Narrows Bridge Collapse
YouTube video - https://www.youtube.com/watch?v=j-zczJXSxnw


 Fig. 10. Straight stroke, work face down, various offsets and stroke lengths


